Screenshot for
Screen recording for
1. Macbook
While viewing the screen you wish to take a screenshot of, press down the following keys simultaneously
command-shift-3
Your computer will save an image file of your whole screen on your desktop. The name of the file will be "Screen Shot ...." followed by the date and time. Every time you press this key combination, a new file will be created. You can rename those files if you need to by Control-clicking on the file on your desktop, and selecting 'rename'
command-shift-4
Use the key combination Command-Shift-4, which will allow you to select a portion of your screen to screenshot. After pressing this combination, use the cursor to drag a rectangle around the area of your screen. Exactly the same as documented above will happen.
2. Windows Desktop or Notebook
While viewing the screen you wish to take a screenshot of, press down the following key simultaneously.
Windows + PrtScn
 +
+ 
Your computer will save a screenshot image in your Pictures Folder in Pictures -> Screenshots. You can rename the screenshot file if you want to by right clicking on the file and select 'rename'. To access the Pictures folder, first open a File Explorer window, and then expand "This PC" under the folder view on the left hand side of the file explorer.
Cant find the PrtScn button on your Windows Keyboard?
On your HP Notebook - Prt Sc is on the right hand Shift key
On your Toshiba Notebook - PrtScr is on the top row of keys, and also has Sysrq written on it
Use Snipping Tool to capture screenshots
Capture any of the following types of snips:
|
Free-form snip |
Draw a free-form shape around an object. |
|
Rectangular snip |
Drag the cursor around an object to form a rectangle. |
|
Window snip |
Select a window, such as a dialog box, that you want to capture. |
|
Full-screen snip |
Capture the entire screen. |
When you capture a snip, it's automatically copied to the Snipping Tool window where you make changes, save, and share.
Open Snipping Tool
|
For Windows 10 |
|
|
For Windows 8.1 or Windows RT 8.1 |
Swipe in from the right edge of the screen, select Search, enter snipping toolin the search box, and then select Snipping Tool from the list of results. |
|
For Windows 7 |
Select Start, then enter snipping tool in the search box, and then select Snipping Tool from the list of results. |
More tips for screenshots on your PC here
3. iPad / iPhone - iOS
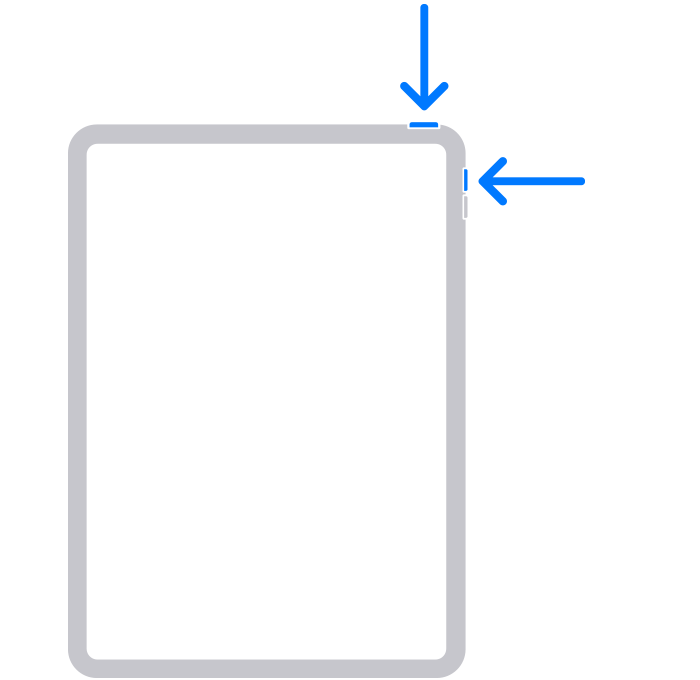
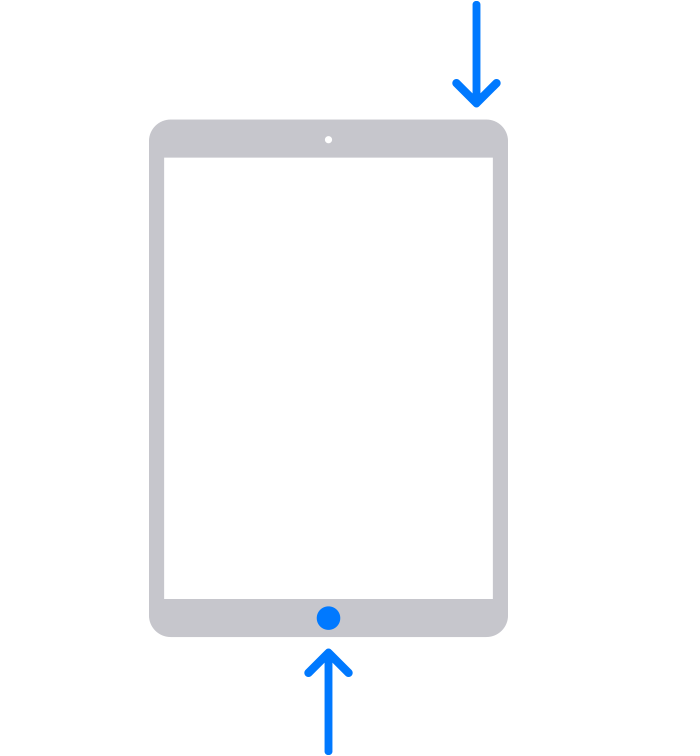
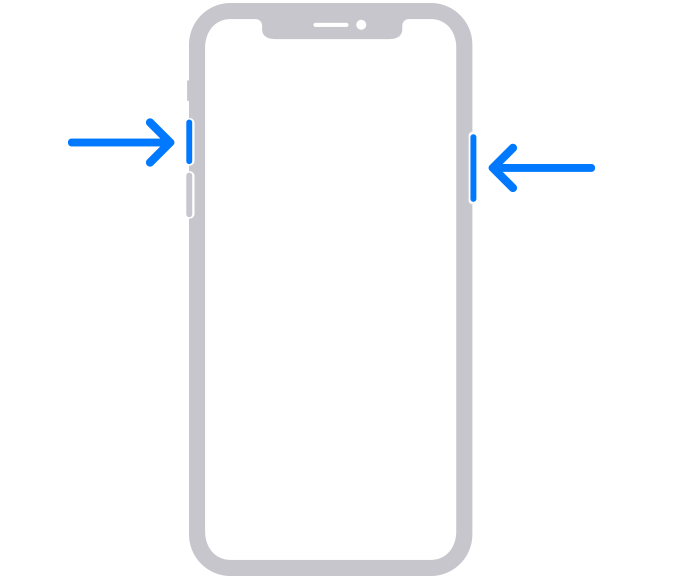
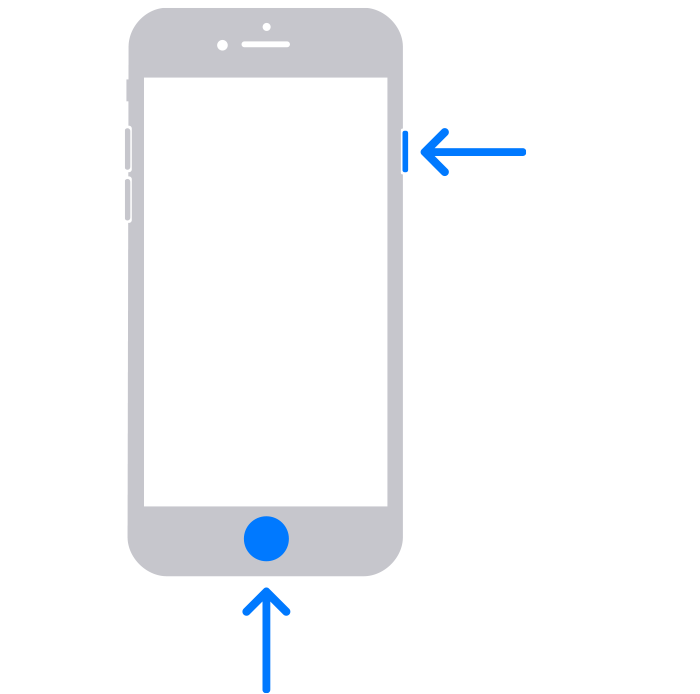
Press the following key combinations, and your device will save an image of the screen to your Photos app.
iPad with FaceID (no home button) You can also swipe from the bottom corner with your Apple pencil.

iPad with TouchID (home button)

iPhone X or later

iPhone 5, 6, 7, 8

Create a screen recording
iPad or iPhone
You can create a screen recording and capture sound on your iPad or iPhone.
-
Go to Settings
 > Control Center, then tap
  next to Screen Recording.
 -
Open Control Center, hold your finger on
 then turn microphone on.
 -
Open Control Center, tap
 , then wait for the three-second countdown.
 -
To stop recording, open Control Center, tap
 or the red status bar at the top of the screen, then tap Stop.
Go to Photos ![]() , then select your screen recording.
, then select your screen recording.
MacBook
1. Launch QuickTime Player
2. Choose File - New Screen Recording (the keyboard shortcut is Control, Command, N)
3. Press the little drop down arrow next to the record button and check the right microphone is selected. It will be the built in one or your headphones if you are wearing them. When you speak the part below the text that says Screen recording should react. Once this is working press the record button which is the red dot in the centre...
4. Select what you wish to record. Click for the whole screen or select for part of it.
5. When you’re finished, click on Stop Record in the Menu Bar.
6. To edit your recording, click on the Edit Menu at the top of your screen. If you wish to, choose Trim.
7. Drag the yellow handles to select only the frames you want to keep in your recording.
7A. When you’re happy with your selection, choose Trim. The greyed out frames will be removed
from the beginning or end of your recording.
8. Now SAVE your screen recording, and share it in your chosen location.
Windows 10 and Windows 11
1. Click into the app you wish to record.
2. Hit the Windows Key + Alt + R to start screen recording. A small recording widget showing how long you've been recording appears somewhere on the screen, most likely in a corner. You can also get here by launching the Xbox Gamebar (Windows Key + G) and then finding the capture widget.
3. Perform whatever actions you want and use your microphone to record audio. You can also mute the mic if you don't want to capture any sound.
4. Hit the Windows Key + Alt + R again to stop screen recording. You can also hit the stop button on the widget. You will get an alert that says "Game clip recorded." If you click on it, you will go into the Gallery section of the Gamebar app and be able to preview the video you captured. You can also find the MP4 file you recorded under your Videos/Captures folder.

Comments
0 comments
Please sign in to leave a comment.